
Since starting my sourdough journey in 2018, I have been making this loaf consistently. It is so easy to work with especially as a new sourdough baker and it is absolutely amazing.
This loaf is a variation of the simple loaf on Alex’s youtube channel but adjusted a bit of the flour weight because I was swapping whole wheat for white bread flour, which tends to hold more flour.
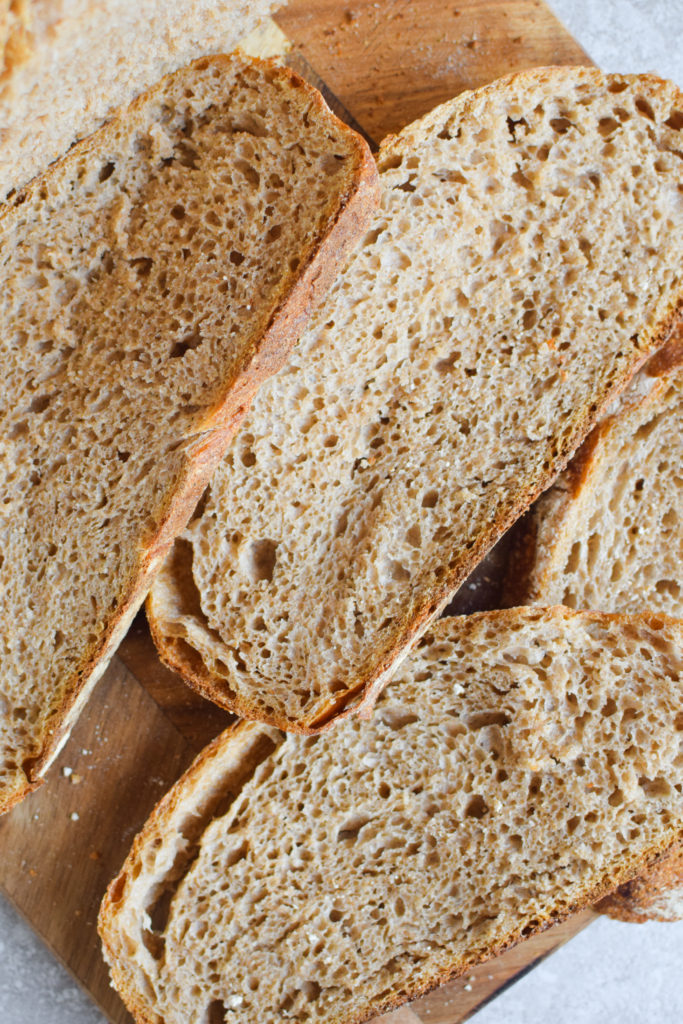
Most people advice starting with an all white loaf, but I say if you want to really taste a nice and rich sourdough, whole what is the way to go. Obviously a full whole wheat boule is another job on its own but I thought it best to combine the best practices of working with a whole wheat loaf to the process of making a simple white sourdough. With this process, I have made sure to create a loaf that is also easier to manage, with a lower hydration content to make sure that it is really easy to get a nice tight boule to shape and a nice rise in the oven when baking.
Before proceeding, please make sure to check out my blog post Sourdough 101 (click here). It gives in depth in formation about resources to start a sourdough starter and tools needed for making sourdough.
Important Terminology
- Levain: levain is a french word for leavening. Since I guess the art of bread baking has been pinned to the french we all subscribe to this word, even though we well know that the use of natural yeast was documented to be used as far bas as in Ancient Egypt
- Mother: this is the sourdough starter that you feed on a regular basis. It is from this that you will take a little to build the levain needed for every loaf
- Autolyse: Drawing from cellular biology, the word autolyse is when a cell breaks down by itself as the word “lyse” means to break down and “auto” means self. I use this definition because it helps us to better understand what is happening with the dough. In terms of baking, autolysing allows the enzymes in the wheat to start breaking down the gem and “digesting it” . This makes the dough more digestible, apparently.
- Bulk Fermentation: this is the process of letting the dough rise. During this period, the yeast starts to break down the sugars in the wheat and start the fermentation process. During this time the yeast will be more active and the process of fermentation will happen faster. The dough will also double in size.
Ingredients
Levain
- 25g whole wheat mother starter
- 100g organic whole wheat flour
- 100g lukewarm water
Dough
- 200g starter
- 400g lukewarm water
- 10g salt
- 300g whole wheat bread flour
- 275g unbleached bread flour
Directions
** these direction follow a baking plan that can be done during the weekend. I usually make these during the weekend but you can make it at your own convenience at what ever time works best for you. Do not focus on the actual times, these are just a guide to show the amount of time used for each task and pauses between each task**
***One more thing to remember, please resist the urge to add more flour in when slapping and folding or working with the dough beyond what has been outlined. Yes sourdough is tackier than the regular bread dough used with instant yeast and may be foreign in texture for anyone unfamiliar. But you need to be patient, adding more flour can make the bread dry***
- 8AM: Mix your levain. I used a whole wheat mother starter I started a few months back. For more details about where to find information on a starter, you can check out my last blog post “Sourdough 101“. In the morning, mix your levain ingredients in a clean container and leave the levain in a warm environment (preferably in the oven that is turned off with the oven lights on) till it doubles in size. I usually put a rubber band at the level of the starter to gage when it has doubled in size. To check when the levain is ready, you can drop a small drop of the levain in a bowl of water and check to see if it floats. The time it takes highly depends on how warm the environment its in is so I would say check on it after 3 hours and see
- 12:00PM: Autolyse. Mix most of the water(leave about 50g for later) and flour for the dough. When you mix this mixture it is going to be very dry but do not worry because we will be adding the levain soon, which should add more hydration
- 12:30PM: Mix in levain and Autolyse II. After 30 mins you are going to fold in the levain. This process requires you to use your hands and it is quite a tacky mixture. Just be patient and mix everything together as thoroughly as you can. Let the dough sit for about 10 mins for a second, shorter autolyes and allow the starter to meld well. Autolysing helps to start breaking down the wheat in the flour and can also help reduce the large holes you will find in sourdough. Obviously we will still achieve an open crumb structure but we do not want such big holes in the dough
- 12:40PM: Salt then Slap and fold. You are going to add the salt and the rest of the water to the dough. The water helps dissolve the salt. After adding the salt you are going to put the dough on a clean surface for slap and fold. It is hard to describe this so I will refer you to this video to understand slap and fold. Click the link here. It is a good way to develop the gluten and more strength to the dough. As you slap and fold, you will start to notice that the dough is less tacky, and holds together. It is not really a sticky mess. After slapping and folding, place the dough in a well oiled bowl, cover the dough and place the dough in a warm place.
- 12:40PM – 4:40PM Bulk Fermentation. For four hours you will be allowing the dough to rise in a warm place, specifically in the oven with the oven light on to keep it warm. In the first hour and half of bulk fermentation, you are going to stretch and fold the dough to develop more strength in the dough. You will repeat this three times — one at 1:10PM, one at 1:40 PM and one at 2:10PM. Check out this video for the stretch and fold. After your last stretch and fold you will leave the dough alone to rise for the remainder of the time left.
- 4:40PM Shape and Cold Ferment. After bulk fermentation, you are going to shape the dough. Shaping the dough is very very key in subsequent rise of the dough so you want to make sure you are shaping the dough right. Click this video to see the technique. I will suggest using a clean surface with clean and dry hands. If your hands are wet the dough will be sliding every where. If the surface has a lot of flour, it could stick to the dough and make it very hard to shape as the dough will be very tacky I usually line the dough with a clean kitchen towel with a lot of flour. Place the dough in a well floured bowl with the base side up.You want it to be well floured so you can take it out the next day.
- Cold Proof. Place the dough in the fridge covered with a kitchen towel overnight.
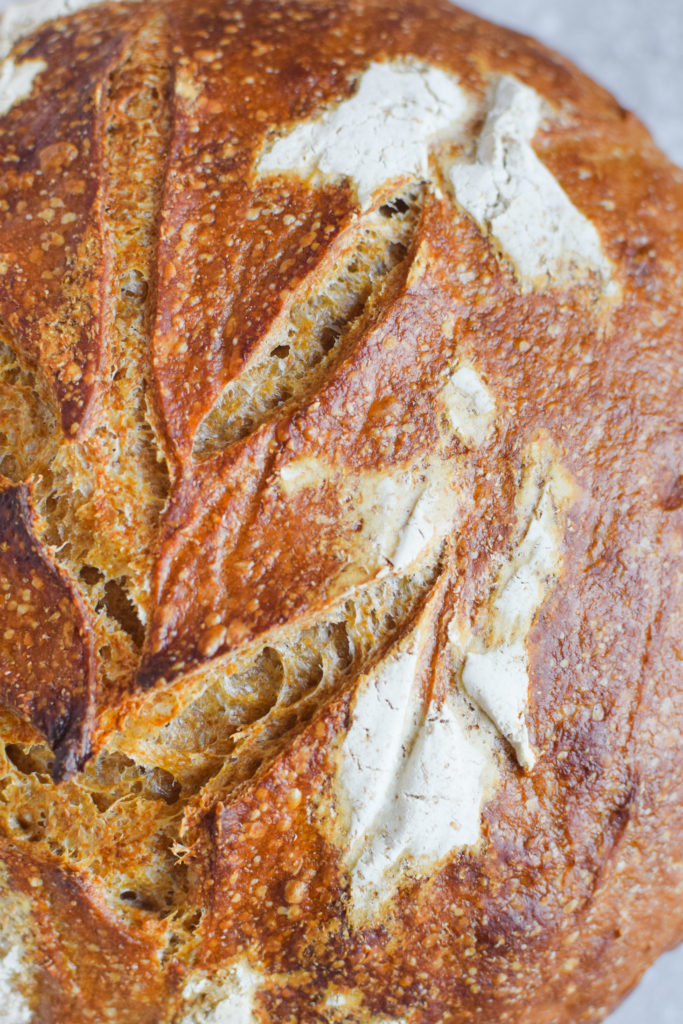
- 8:AM Next Day Score. Heat your oven to 500°F with your dutch oven in the oven for at least 20 mins. Cnce the oven is hot and the 20 minutes has passed, take the dutch oven out and flip the dough into the dutch oven with the base at the bottom. Score the top of the dough with a sharp knife. Scoring gives a direction for the dough to rice
- 8:15AM Baking and Cooling. Place the dutch oven in the oven and turn the oven down to 450°F for 25 mins. After 25mins, remove the lid of the dutch oven, turn the oven down to 400°F and let the bread bake for another 20 mins. After the dough has fully baked, take the dough out and place the bread on a cooling rack till it has FULLY cooled down. This is important because it allows the gluten to set and finishes the cooking process.

Pin the Recipe for later


2 Comments
Anarky V
October 16, 2020 at 7:37 amYummy looks delicious 🤩🤗
Sesame Miso Sourdough - The Canadian African
November 29, 2022 at 3:13 am[…] Simple whole wheat sourdough loaf recipe […]